Monday, 9 April 2012

Module Two - Chapter Three

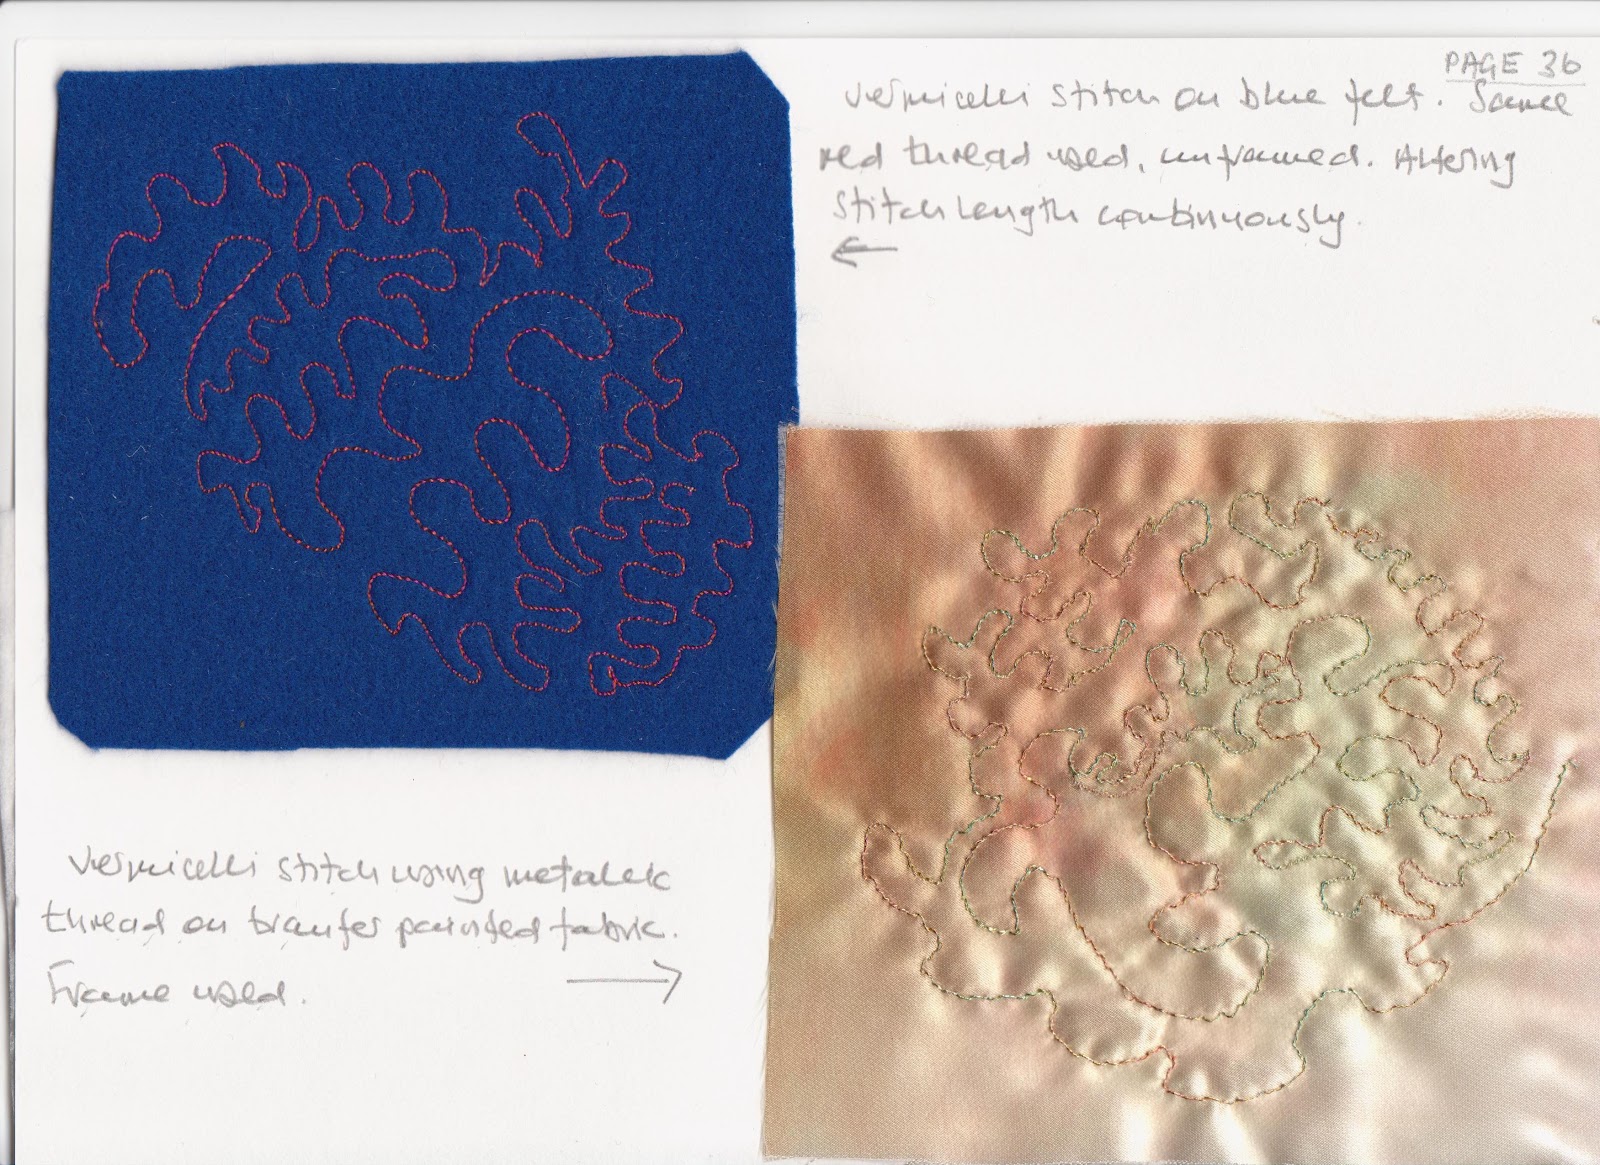
At long last I have finished Chapter Three of this Module.  I have had two big hold ups. The first being is that I didn't realise how to alter the bobbin tension from the bobbin case.  I thought it could only be altered from the tension dial on top of my machine.  However, after looking through books and the internet finally managed to work it out.  As a result some stitches aren't as 'loopy' as they could be.  The second big hold up has been a form of 'writers block' with the final exercise.  I think this may have come about through not having any inspiring background material to work from.  I could find plenty of lovely shapes in my photograph collection but I couldn't transfer ideas onto my uninspiring material. 

Despite the above I have really enjoyed this chapter and have become very initimate with the workings of my sewing machine.  I think I may have to get another bobbin case though.  Since I've been loosening it, the normal tension does not seem so good.  I think I might use one case for this kind of work and keep another bobbin case for normal tension.

Below are some photos of shapes and forms that I took at Mottisfont Abbey during March.
Some little fairy must live in the 'door way' in this fab tree.

Such a pleasing simple shape and lovely wall


Strange shapes on the ends of these branches, but they are lovely.


Vermicelli Stitch - Page 47 Module 2


Zigzag Vermicelli Stitch - Page 49 of Module 2
Altering stitch length and width on felt


Granite Stitch - Page 50 of Module 2


Whip Stitch - Page 52 of Module 2


Feather Stitch - Page 53 of Module 2
I didn't realise that the bobbin tension could be altered by turning the screw on the bobbin case, so the stitches are rather tight

Having worked out how to loosen the bobbin tension I was able to alter the bobbin tension to create small and large feather stitches.

Moss Stitch - Page 54 of Module 2


It was good to learn this technique of cutting through the loops to create a fluffy texture.  This stitch could be used to create the lichen pictured below.

Photo of lichen on tree at RHS Rosemore Devon taken by me.  This would be wonderful to stitch.

Using the Stitches - Page 55 of Module 2
I can't explain why but I have had a real problem coming up with any ideas for the final part of the chapter.  I think I've been thinking about this bit of work for 3 or 4 weeks and kept coming up against a brick wall.  Part of the problem has been not having any inspiring  background material despite many searches on the internet.  I shall just have to get felting myself! 

Just want to add that the poor old squash on the right went skew whiff as I bumped into the frame.  Very frustrating.  I should have used horizontal stitches for the squashes to stand on.

Tuesday, 28 February 2012

Module Two - Chapter 2


Hello, here is Chapter 2 of Module 2.  I've had mixed results with this chapter but have learnt a lot.  What have I learnt?  Difficult to put into words but it is more about the way I work than anything else and how one feels emotionally on the day.  We have had a sad time as we have lost our lovely labrador Molly since my last blog and it has definitely had an affect on how I have worked this month.  On the other hand we were lucky to get tickets to see David Hockney's exhibition at the Royal Academy which was magnificent and uplifting.

Lovely Molly

It was lovely to meet Janet at Urchfont last week.  I was there making rag rugs with Debbie Siniska and a group of great ladies.  Janet was there with her colleagues from the MEG group and I had an opportunity to see their magnificent work. 

Making Patterns - Picture Gallery Page 19 of Module 2

As with most things once you start looking you see it everywhere, and so it has been with patterns.  The main thing is to find patterns that are interesting and inspiring.  So I have had to look harder at the world around me.  I am still trying to get more disciplined at carrying a camera/sketchbook about with me.  There are lots and lots of design books with amazing patterns.  I discovered that the V&A museum have produced some lovely books illustrating their wonderful collection of patterns by various artists and designers which I have bought.
My flower brick - an example of an irregular flower pattern.  I like the shape of the vase and the clear blue simplicity of the pattern

An example of an irregular flower pattern taken from bulb catalogue.  Gorgeous texture velvety smooth but snake like too.

My glasses case - an example of irregular flower pattern - loud, bright and fun


My knitting basket - example of regular pattern - an ethnic look

Oriental Poppy regular pattern taken from flowercatlogue.  Exotic and feline.

Dry stone wall an example of a regular pattern on top and irregular pattern underneath
(Abbotsbury Gardens - Dorset) - great texture and angular.

Example of mirror and rotational symmetry on a wall hanging I made a couple of years ago - just included as a good example


Another example of mirror image pattern - ethnic looking again.

Printing - Page 25 of Module 2
I've never heard of it before but Fun Foam is wonderful stuff. Making the print block was easy and a lot of fun with the benefit of producing your own ideas quickly and cheaply for printing on card, paper and fabric.  Although you warned against making the print block too large I seem to have made mine too large and as a result haven't managed to get many repeats on A4 paper so some images have been produced on A3.

Unfortunately I haven't been very adventurous with using different types of paper.  Throughout the exercise I was concerned that my stamp was too large (I know - I could have made a smaller one but I was feeling lazy) and was trying to get pleasing prints and therefore forgot about using different types of paper.  I also had a sneaking thought that there are so many wonderful handmade papers available that I could use those.  I know, I should have a smacked hand for that thought!


Original drawing of flower to be 'exploded' into Fun Foam print

My exploded motif to be formed into a Fun Foam block

Straight repeats on plain A3 cartridge paper - page 28 of Module 2

Spot repeat on plain A3 cartridge paper - page 29 of Module 2

Half drop repeat orange upon orange background - page 29 of Module 2

Half drop repeats on A4 copy paper. Orange background and then used wire brush with green and white acrylic paint which created a scratched look to the surface.   This was the inspiration for my stiched printed piece on black felt. - page 29 of Module 2


Mirror image, reflective symmetry on A4 with acrylic painted background
As you can see, highly unsuccessful, the top pair are OKish but went wrong with the bottom pair.  This was also unsuccessful as I found stenciling difficult to do and got a lot of paint bleeding underneath the card and I got into a bit of a mess.  (I find paint and ink very difficult to handle well). -Page 31 of Module 2

Rotational symmetry using wood block on A4 photocopy paper - Page 32 of Module 2
Experiment using fun foam block and stencil - Page 33 of Module 2

Experiment - Page 32 of Module 2
I think this (above) is the best piece of printing throughout this chapter.  The pattern is made up of irregular prints using the print block and stencil.  I especially love the colours.  It reminds me of scattered autumn leaves but this wasn't intentional, it just came out that way.  I think it would make a lovely stitched piece of work and could be used as a postcard or greetings card.

Stitching into a printed pattern piece - Page 34 of Module 2
 Stitching into a printed pattern piece - Page 34 of Module 2
This exercise was very enjoyable to do.  The pattern is half drop repeats using my print block.  I stamped over the felt with layers of blue, green and white acrylic paint with the idea that I would enhance the white with silver thread and then use blue thread to just pick out the odd line here and there.  Perhaps I could have used more stitching but I didn't want it to look too stitched.  I think that stamping the images with different layers of coloured paint has created a more interesting effect  the stitching adds to the texture but a little more stitching would be better.
Print and Stitch - Page 37 of Module 2

Print and Stitch - Page 35-37 of Module 2
Oh dear, my ‘BĂȘte Noir’ - transfer paints!  We just don't seem to get along.  I would love to get along with transfer paints but always have very disappointing results and I can't fathom out why.  I know we have had this discussion before and I seem to be going about it in the right way.  Maybe it's the paper I'm using so I will try using different types - I will not give up!

I was disappointed with the woodblock print as I didn't find many interesting flowery ones. I should have made another fun foam one, but I did want to try a wood block print. What with that and the lack lustre transfer paint I am very disappointed with this piece of work. My heart was just not in it for lots of reasons and this shows in the stitching and layout. I used pelmet Vilene for the stabiliser and at times this did not run smoothly under the needle, it seemed to stick or jar making a smooth picture difficult.

Looking at it now I could create more interest and movement by stitching some cow parsley sweeping across the bottom or behind the daisies. The picture also needs more texture and this could have been achieved if the transfer paints had been more successful along with a stronger background wood block print, which can hardly be seen because of the poor quality of the transfer paint.

Tuesday, 24 January 2012

Module Two - Chapter One

My husband thought I was quite mad when I jumped up and down and squeeled like an excited 6 year old.  All because I had received Module 2 from Distant Stitch.  The module is amazing and I am so excited about what I am going to learn! 

Collecting Resources, Looking at Shape and Form – Page 3-7
Very enjoyable and ongoing activity.  A lot of shapes and forms share their characteristics e.g. you can have a rounded yet spiked form.  My main sources are magazines and books.  Need to get out and take more photos though.  David Hockney was on the TV a few weeks ago talking about colour in the landscape and now I can’t go out for a walk without asking the question “What colour is that hedge/ flower/patch of grass?”  Going to see his exhibition early February so should be fabulous.

 Here is a small sample of what I have collected.


To Draw or not to Draw – Page 8
I made four attempts at drawing a simple flower shape.  The fourth attempt was definitely my best one.  Tried to remember that the exercise was not about how good at drawing I was but about finding shape and form.  It was helpful to remember that.  I still enjoyed the drawing however, and bought a book about how I could improve my drawing – just to have a go.

First attempt at drawing a flower as per Chapter One, page 8


Third go at drawing

Fourth go at drawing flower
Adding to your Drawing – Page 9
After a few attempts at trying to capture the shape and form of the poppy I was quite pleased with the drawing.  I was very pleased with the free embroidery I think I captured the shape of the poppy quite well.
Print, drawing and stitching of poppy as per Chapter One, page 9
"Adding to Your Drawing"

Inspiration from the Artists – Page 10-14
Cefyn Burgess
I have never heard of this artist before.  At first I wasn’t sure about his work but when I looked at several more pieces of his work on the Internet they were very moving.  I’m not sure how he uses stitch to get the effect he does, but it looks like a pencil drawing.  Heavier and lighter use of the thread indicates shape, form and movement of the plants.  His work is very beautiful because it is so naturalistic.  It’s like standing in a field of wild flowers.

Drawing with your Needle-Page10-11
Cefyn Burgess Style
I amazed myself at my three drawings of hedgerow flowers.  I have an old book of illustrated wild flowers which inspired me to draw.  It took a few attempts but finally so pleased with the results.  I just took my time and concentrated quite hard.   I also feel very pleased with the stitching, again just concentrated very hard and took my time.  I see that Cefyn Burgess has stitched words into his work and looking back now wished I had written something, even just the names of the plants.  But it could be an idea for later maybe.

Picture of stitching by Cefyn Burgess


Drawing in style of Cefyn Burgess for stitching as below


First piece of stitching in style of Cefyn Burgess


Second piece of stitching in style of Cefyn Burgess

Third piece of stitching in the style of Cefyn Burgess
 
Grinling Gibbons
Another artist I haven’t heard of.  Although his work is amazing I can’t quite empathise with it.  The carvings are amazing and very life like but don’t appear very natural.  Capturing the downloaded image in a drawing was much more difficult than my drawings of wild flowers.  It took a few attempts again, but I think I have managed it.

I couldn’t find any artificial flowers or seed heads.  However, I found a picture of Arum lilies in a gardening book, so used these with their leaves and a picture of poppy seed head to compose my drawing.  My stitching isn’t too bad, but again I found this more difficult than the smaller wild flowers done previously.  It was difficult finding the right place to start and making the first stitch is always the hardest.  Overall though I am pleased with what I have done.


An example of the carving of Grinling Gibbons

First attempt at drawing from Grinling Gibbons piece above

Drawing from carving of Grinling Gibbons
Drawing of what I will stitch as per Chapter One, page 13

Final stitched piece - Chapter One page 14
Creating Voids
Page 15

I loved doing this because it involved different techniques.  It was difficult finding enough jugs/vases to create a composition.  Unfortunately I didn’t have any tall vessels only short stubby ones, so the composition isn’t great.  I think I draw flowers better than jugs, but “practice makes perfect.”

The difficulty I had with this exercise was determining which lines to leave out when doing the tracing.  It wasn’t until I was half way through stitching that I wished I had left other lines out and other lines in.  Another difficulty was concentration on the stitching.  Granite stitch is very intense and repetitive.  There was also a lot of space to fill in with the stitching and so it was easy to become unfocused and letting the needle jump about.  I noticed my shoulders and wrists aching too, so had to discipline myself to stop stitching now and again and relax my shoulders.

Initial sketch to be stitched to create voids

Final tracing with coloured areas for stitching


Piece stitched in granite stitch

Self Assessment
Module Two, Chapter One
In conclusion, I feel that I have
  •  Developed a liking for collecting things.  (I am not a hoarder and throw everything out regularly!)
  • Developed an interest in and improved my drawing. 
  •  Developed an awareness of shape and form by using different styles of stitching such as in the style of Cefyn Burgess and Grinling Gibbons. 
  • Creating voids in order to demonstrate other shapes and forms.
  • Improved my skills at free machine embroidery.